
OEM Silicone Baby Feeding Set: Concept to Production in 60 Days
Every OEM silicone baby feeding set project starts the same way: a sketch, a photo of a competitor product, or a half-formed idea lands in a factory’s inbox.
What happens in the next 60 days decides whether you get a market-ready product or a six-month lesson in what not to do.
I have spent years on the factory side of custom tableware development, and I can tell you the difference between projects that ship on time and projects that unravel. It is not luck. It is a sequence of gates — decision points where a buyer either locks in progress or quietly gives the schedule away.
This guide walks you through those gates week by week, from the factory insider’s view, so you know exactly what to send, what to approve, and what to demand at each step of your custom silicone baby tableware factory engagement.

The OEM Silicone Baby Feeding Set 60-Day Journey
A complete OEM silicone baby feeding set project fits into nine weeks, with a decision gate at each boundary. Approve on time and the project moves. Delay a gate and every downstream date shifts with it.
| Week | Stage | Gate Decision | Cost of Missing the Gate |
|---|---|---|---|
| 1 | Design brief | Brief approved | Vague specs surface as defects at T1 |
| 2 | 3D rendering and DFM | Design locked | Changes after tooling start are the most expensive fix in the project |
| 3–5 | Mold fabrication | Mold trial ready | Rushed tooling produces rejected parts |
| 6 | T1 sample approval | Sample approved | A slow review adds days to every later stage |
| 6–7 | Color matching | Color approved | Unchecked color drifts between batches |
| 7–8 | Packaging design | Packaging approved | Artwork errors cost reprints and delays |
| 8–9 | Production and QC | Shipment released | Missing documents stall customs |
This schedule assumes moderate complexity and single-cavity or two-cavity molds per part. Complex geometry, multi-cavity tooling, or a new material certification adds two to four weeks. The gate structure stays the same — only the durations stretch.
What follows is each gate explained as a scene: what happens at the factory, where projects typically fail, and how to pass it cleanly.
Week 1: The Brief Gate
The design brief is the most important document in the entire project. Factories quote from it, engineers design from it, and quality control checks against it.
A precise brief compresses every later stage. A vague one expands them, because every missing specification gets guessed — and every guess eventually surfaces as a defect at the T1 sample gate.
What a Complete Brief Contains
Product configuration: which pieces are in the set, with target dimensions and capacities. For a 5-piece baby feeding set, that means divided plate diameter and section depths, bowl capacity in milliliters, spoon length and tip firmness, cup volume, and bib size.
Material specification: food-grade platinum-cured silicone, Shore hardness target (typically 40–60 Shore A for feeding surfaces), and certification targets such as LFGB or FDA, because the target determines the raw material grade the factory sources. The FDA’s Packaging and Food Contact Substances program governs food contact compliance in the US market, while the BfR recommendations on food contact materials define the European benchmark that LFGB testing is built on.
Functional requirements: suction base strength, dishwasher and microwave tolerance, sterilization compatibility, and safety features such as anti-choke design or breakaway handles.
Packaging direction: retail box size, gift set configuration, logo placement, and shelf display intent. Rough direction is enough at this stage; the factory plans the packaging gate around it.
Reference images: photos of competitor products, sketches, or a 3D file. Reference images communicate proportion and style instantly, and they cost you nothing to provide.
What the Factory Does With Your Brief
Inside the factory, a complete brief starts a specific chain of events. A project engineer is assigned, the raw material supplier is asked to confirm the food-grade compound and certification path, and the mold shop estimates tooling cost and machining time.
Within 48 hours you should receive three things back: a feasibility note flagging any specification that is difficult or expensive to produce, a tooling quotation with a cost breakdown, and a proposed timeline.
If the response is vague, or the factory asks questions the brief already answers, that is the first warning signal of the whole project. A factory that cannot read a specification cleanly will not manufacture to it cleanly either.
The Failure Mode
The most common brief failure is not missing information — it is the buyer assuming the factory will fill the gaps. A factory that fills your gaps fills them its own way, and its way rarely matches your market.
If your brief does not state the suction base requirement, you get a plate that looks right and slides across the table. If it does not state Shore hardness, you get a spoon tip that is too stiff for teething gums.
Send the complete brief, and ask the factory to confirm the specification back in writing before any design work starts.
Week 2: The 3D and DFM Gate
With the brief approved, our design team builds a 3D model of each piece. You receive renderings from multiple angles, and the engineering team runs a design-for-manufacturing review.
The DFM review is where silicone-specific knowledge earns its keep. Liquid silicone rubber shrinks between 2 and 4 percent during curing, so the cavity dimensions must be engineered with the correct shrinkage factor. The suction base needs a calculated rim angle and material thickness to hold a vacuum. Gate and parting line placement determines whether visible marks land on the eating surface or the hidden underside.
What the DFM Review Covers
Wall thickness: silicone parts need consistent wall thickness to cure evenly. Thin sections tear; thick sections slow curing and trap air.
Draft angles and undercuts: parts must eject cleanly from the cavity. Undercuts require slides or lifters in the tool, adding cost. A good review either redesigns them away or prices them honestly.
Gate placement: gates should land on the underside of a plate or bowl, never on the eating surface. A gate on the eating surface is a design error no polishing fixes.
Shrinkage compensation: the cavity must be cut for the material’s real shrinkage, or every finished part comes out slightly undersized.
The Failure Mode
Design changes after approval. At the end of Week 2, you approve the 3D files and the quotation. After that point, the factory orders steel, and every subsequent change — a deeper bowl, a wider rim, a different spoon curve — means mold rework or new tooling.
Treat the 3D approval as the point of no return. It effectively is one, and the buyers who treat it that way are the ones who hit their launch dates.
Two specification details deserve special attention at this gate because they are easy to overlook and expensive to fix later.
The first is the suction base. A baby suction plate holds by creating a vacuum between the base and a smooth surface. The rim angle, base diameter, and material thickness all contribute to that seal, and the geometry must be engineered, not approximated. Ask the DFM report to state the suction base parameters explicitly, and specify a test method for the T1 gate.
The second is shrinkage compensation. Liquid silicone rubber shrinks 2–4 percent during curing, and the cavity dimensions must be cut for the material’s real shrinkage factor. A factory that applies a generic shrinkage value to your design produces undersized parts that fail dimensional checks — and dimensional failures at T1 cost a full tooling revision. Our custom manufacturing page shows the design and DFM workflow we run before any steel is ordered.
Weeks 3–5: The Mold Gate — Compression or Injection?
With the design locked, the factory machines the molds. For a 5-piece silicone feeding set, that means five separate tools — plate, bowl, spoon, cup, and bib — each requiring cavity machining, polishing, and fitting.
The first process decision is which molding method to use, because it drives cost, speed, and consistency for the whole project.
| Dimension | Compression Molding | LSR Injection Molding |
|---|---|---|
| Tooling cost | Lower, simpler mold construction | Higher, closed-cavity tooling |
| Cycle time | Longer per part | Much shorter per part |
| Flash and trimming | Manual trimming at the parting line | Minimal flash, less handwork |
| Dimensional tolerance | Moderate | Tight and repeatable |
| Best fit | Volumes under 50,000 units per year, simpler geometry | High volume or complex geometry |
For a starter feeding set under 50,000 units per year, compression molding is usually the cost-effective entry. When volumes climb or geometry gets complex, an experienced custom silicone baby tableware factory moves the high-run pieces to LSR injection. We explain this trade-off for every part in a set on our factory capability page, which also covers mold steel selection and cavity planning.
Mold Steel and Cavity Count
Molds for silicone tableware typically use hardened tool steel for the cavity surfaces, because they must survive repeated curing cycles at 150–180 degrees Celsius without surface degradation. Softer steels machine faster and cost less, but they wear and pit sooner, and pits show up on every molded part.
Cavity count is the other cost driver. A single-cavity tool keeps the mold investment lowest and is the right starting point for a new product. Two-cavity tools roughly halve the per-piece cycle time for about 40–60 percent more tooling cost, which pays off when annual volume justifies it.
Match the cavity count to your realistic volume, not your optimistic one. Over-tooling for volume that does not exist is the most common budget mistake in custom silicone baby tableware factory quotations.
The Failure Mode
Over-tooling for volume that does not exist. Single-cavity tools keep the mold investment low. Two-cavity tools roughly halve the per-piece cycle time for about 40–60 percent more tooling cost. Match the cavity count to your realistic annual volume, and confirm the steel grade, hardness, cavity count, and delivery date in writing before machining starts.
Week 6: The T1 Sample Gate for Your OEM Silicone Baby Feeding Set

When the molds are finished, the factory runs trial shots. The first samples — T1 — are the moment of truth for your OEM silicone baby feeding set.
This is where the design brief meets reality, and it is the gate most buyers rush.
The T1 Checklist for Your OEM Silicone Baby Feeding Set
Dimension check: every critical dimension measured against the specification — diameter, capacity, wall thickness, and suction base fit. Request the full dimensional report, not a summary.
Surface inspection: check for flash, pitting, sink marks, and parting line visibility. Cosmetic defects that pass at T1 repeat in production.
Suction performance: the plate must hold its grip on a smooth surface. Test it, then test it after a dishwasher cycle. Suction bases that pass fresh but fail after cleaning are a known defect mode in baby tableware.
Edge and tip feel: run your finger along every edge. A training spoon tip should flex without cutting; a cup rim should be smooth.
Color direction: T1 parts show the raw silicone before masterbatch. Evaluate direction only; final color judgment belongs to the color gate.
What to Request With Your T1 Samples
The samples alone are not enough to approve a gate. Request four things alongside them.
A full dimensional inspection report with every critical measurement against the specification — not a summary. A video of the trial shot, so you can see the mold fill and the part eject. Suction test footage on a smooth surface, ideally after a dishwasher cycle. And close-up photos of every surface that matters for cosmetics, including the parting line and gate areas.
A factory that cannot produce measurement data and trial documentation is not running a controlled process, and an uncontrolled process cannot hold a 60-day schedule.
The Failure Mode
Slow approval. Review T1 samples within 48 hours of receipt and respond with approval or a numbered defect list. Delayed responses are the most common cause of schedule slip at this gate, and every day you hold the samples pushes production back.
Also ask the factory whether the sample was made on the production line or in a lab. Lab samples hide the defects that appear at production scale. Our sample approval process guide covers the full audit protocol we recommend buyers run on first articles.
Weeks 6–7: The Color Gate
Baby tableware lives on color. The Morandi palettes, the soft pastels, the matte finishes — they are the product’s identity on the shelf.
Color matching is a technical process, not an aesthetic one. You send a Pantone reference or a physical sample, and the masterbatch supplier formulates pigment into the silicone compound until trial parts land within tolerance. This takes five to ten days per color, including formulation and trial cycles.
What Costs Extra
Standard colors from the factory’s existing palette cost little or nothing. Custom Pantone matches carry a color matching fee — typically 200–400 USD per color — and may require a minimum pigment purchase for the masterbatch. A set in three custom colors means three matching fees and three masterbatch formulations.
The Consistency Question
Ask how the factory maintains color across production batches. The answer should involve masterbatch lot control, documented colorimeter readings, and Delta-E tolerance standards — not visual comparison alone.
Silicone color shifts subtly with curing temperature and time. A factory that does not measure color is guessing at it, and your brand consistency is not a good thing to guess about. Approve color on actual production material under retail lighting, not on a screen.
One practical tip for remote approval: ask the factory to keep a masterbatch reference chip from the approved formulation. The chip becomes the physical benchmark for every production batch, and it gives your inspector something concrete to compare against at pre-shipment inspection. Color disputes are the easiest disputes to prevent and the hardest to resolve after the goods are packed.
Weeks 7–9: The Packaging, Production, and QC Gate
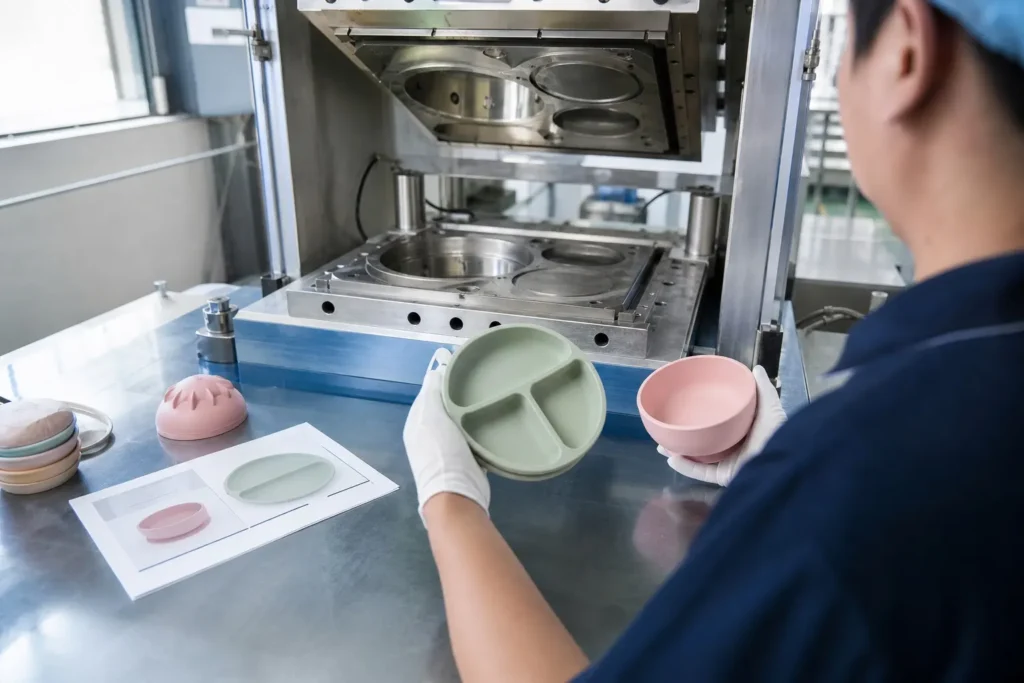
The packaging window overlaps the end of color matching, because box design and artwork proofs proceed in parallel with final color work. Then production runs, and quality control earns its keep.
Packaging Decisions
A 5-piece feeding set typically ships in a compact retail box with individual cavities, or a gift box presentation set. Gift box configurations command higher retail prices and dominate the corporate gifting channel — online channels already account for roughly 35 percent of silicone baby product sales, and sets that photograph well win there.
Specify box dimensions, materials, print finish, inner inserts that hold each piece, barcode and regulatory labeling placement, and any window cutouts. If you plan Amazon sales, the packaging must survive fulfillment center handling — request a drop test report.
Approve pre-press proofs carefully. Print colors shift on different substrates, and every artwork change after proof approval carries a reprint cost and a schedule delay.
Production and QC Gates
With samples approved, colors matched, and packaging locked, the factory schedules production. Incoming inspection verifies the raw compound and masterbatch against specification. In-process inspection catches defects during curing and demolding, when they are cheap. Final inspection tests finished pieces against the approved samples, including suction performance, dimensions, and cosmetic standards.
Every batch should ship with the test reports your market requires — migration testing for food contact compliance, and where applicable, phthalate and VOC testing. Request certificates of analysis per batch, and ask how traceability runs from raw material lot to finished carton. Our wheat straw tableware lead time guide explains how production scheduling and inspection windows are structured, and the same discipline applies to silicone lines.
Before the container leaves, decide whether you run a pre-shipment inspection — your own agent or a third-party inspector. Sample per AQL Level II, verify carton counts against the packing list, and spot-check packaging print against the approved proofs.
The Shipment Document Pack
Before the container is loaded, confirm the document pack is complete. The proforma invoice and final commercial invoice, the packing list with carton counts and weights, the certificates of analysis for each production batch, the test reports your market requires, and the pre-shipment inspection report if you ran one.
Missing documents are the most common cause of customs delays, and customs delays at the destination are entirely outside the factory’s control. Verify the pack against a checklist at the factory gate, not after the vessel sails.
B2B Buyer Checklist: 8 Checks Before You Approve Your OEM Silicone Baby Feeding Set
| Check | Question | Why It Matters |
|---|---|---|
| Complete design brief | Does the brief state pieces, dimensions, capacity, Shore hardness, and certifications? | Missing specs get guessed, and guesses surface as defects at T1 |
| Locked 3D files | Are the renderings and DFM notes approved in writing before steel is ordered? | Changes after tooling start are the most expensive mistake in the project |
| Mold ownership clause | Does the contract transfer mold ownership and CAD files on final payment? | Without it, your custom mold is effectively the factory’s asset |
| Current test reports | Does the factory hold LFGB and FDA reports for the actual compound? | Certification documents are the proof your product can enter the market |
| Production-line samples | Was the T1 sample made on the production line, not in a lab? | Lab samples hide defects that appear at production scale |
| Suction performance | Does the plate keep its grip after dishwasher cycles? | Suction failure after cleaning is a known defect in badly engineered sets |
| Color tolerance | Are Delta-E tolerance and masterbatch lot control documented? | Silicone color drifts with curing conditions; only measurement keeps batches consistent |
| Shipment documentation | Are test reports, packing list, and inspection reports ready before loading? | Missing documents stall customs clearance and delay your stock |
OEM Silicone Baby Feeding Set FAQ
Q: How long does an OEM silicone baby feeding set project take?
A: About 60 days from design brief to finished production with moderate complexity: week 1 brief, week 2 3D rendering and DFM, weeks 3–5 mold fabrication, week 6 T1 sample approval, weeks 6–7 color matching, weeks 7–8 packaging, weeks 8–9 production and QC. Complex geometry or new certifications add two to four weeks.
Q: What are the MOQ and cost for a custom silicone feeding set?
A: Custom designs with new molds typically carry a MOQ of 1,000–3,000 sets depending on mold complexity. Tooling for a 5-piece set runs about 10,000–20,000 USD, and unit prices for B2B volumes land around 4–9 USD per set at 5,000–10,000 sets. Custom Pantone colors add 200–400 USD per color in matching fees.
Q: LFGB or FDA — which certification do I need?
A: Both, if you sell in both markets. FDA compliance covers the US. LFGB testing — which adds sensory testing for taste and odor on top of the migration limits required by the EU food contact materials framework — is the de facto European benchmark. Match the certification set to your actual sales markets and ask the factory for current test reports on the compound they will use.
Q: What is a T1 sample, and why does approval matter?
A: T1 samples are the first parts produced from your new molds, inspected against the specification before production approval. Review them within 48 hours and respond with approval or a numbered defect list. Slow reviews are the most common cause of schedule slip at this gate.
Q: Can I change the design after the mold is made?
A: Minor surface and color changes may be possible with cavity modifications. Structural changes require mold rework or new tooling, with added cost and weeks. Lock the design at the 3D approval gate — changes after steel is ordered are the most expensive decision in the project.
Conclusion: Start Your OEM Silicone Baby Feeding Set Project
A 60-day OEM silicone baby feeding set project is fast only if the foundations are solid.
The buyers who hit the timeline follow the same pattern: they send a complete design brief, they treat the 3D approval as the point of no return, they review T1 samples within 48 hours, and they put every commercial term — tooling breakdown, sample policy, mold ownership, and delivery dates — in writing before production starts.
The market rewards the prepared. Feeding products account for over 45 percent of the global silicone baby product market, which is projected to grow from about 2.8 billion USD in 2024 to 4.7 billion USD by 2033, according to DataHorizzon Research’s silicone baby product market report. The brands that ship compliant, well-designed sets first are the ones that own the category.
If you are planning an OEM silicone baby feeding set, here is where to go next:
Request a quotation and production timeline for your specific configuration — custom project inquiry.
Review our mold, tooling, and factory capabilities — factory capability page.
Read the full first-article audit protocol — sample approval process guide.
Compare OEM and ODM models before you commit tooling money — OEM vs ODM guide.
CONTACT US

How to Verify Wheat Straw Fiber Content Claims
A factory-side evidence guide for buyers assessing wheat straw percentage claims, mass-balance records, laboratory methods and change control.

Platinum Cured vs Peroxide Cured Silicone: Buyer Comparison
A decision-focused comparison of platinum-addition and peroxide cure systems for custom silicone tableware, including process, evidence and sourcing tradeoffs.

Is Silicone Tableware Microwave Safe and Dishwasher Safe?
A buyer-focused answer on when silicone tableware can be used in microwaves and dishwashers, what evidence matters, and how to validate a custom product.

Custom Tableware Sample Approval: Golden Sample Guide
A stage-gate factory guide to drawings, prototypes, tooling trials, packaging samples, golden samples and production release for custom tableware.

Tableware AQL Inspection: Buyer Guide
A factory-side guide to defect classification, sampling levels, acceptance limits and evidence for silicone and wheat-straw tableware shipments.

Food Contact Tableware Traceability: Buyer Guide
A factory-insider guide to material identity, declarations, test reports, batch records, change control and shipment traceability for B2B tableware buyers.
One Response